Puzzle Design (Portal 2)
Type of Project: Solo Academic | Role: Level Designer | Size: Independent | Duration: 5 Weeks | Year Created: Early 2023 | Software: Portal 2 Level Editor
Overview
Approximately five weeks is how long it took me to realize the nuances of puzzle design. The project goal, was to create five portal levels that used preexisting mechanics that worked together. My personal goal was to emulate the feeling of classic portal puzzles and put my own spin on them to push myself. In this process, I learned that puzzle design is more than the pieces we give the player and more about how we present them. I learned how to properly teach players mechanics that I could use in all my future projects.
Planning

©God of War. (2018). Sony Interactive Entertainment
©Candy Crush Saga. (2012). Ltd. King

I was initially overwhelmed, and I asked myself how do you make a proper puzzle? I had not played many puzzle games outside of Candy Crush Saga, Portal 1, Portal 2, and the occasional puzzle section in God of War (2018). All of those games are wildly different. Camera perspective, core gameplay loop, engagement types, and reason to play them are far apart. Despite this, they share one thing in common. They introduce their puzzles and mechanics in bite-size chunks to the player over time and then expand upon those mechanics. My goal became to recreate how those games teach mechanics effectively. For the academic project, I spent several hours each of those weeks researching, refining, and adjusting to try to make unique puzzles.
©Portal. (2007). Valve Corporation
My first step to figuring out my plan for my levels was reacquainting myself with Portal 2 and learning what was possible with the level editor tool. The first thing I did was play hours upon hours of community levels that other creators had made. Evaluating and understanding the ways those individuals used the different mechanics within the game, and how far I could push the boundaries. The next step after playing several community test chambers to understand the scope of what a Portal level could be I dive into the original Portal. I played through the entire game in around an hour, taking into account how the original Portal levels paced themselves, how they introduced mechanics, and how they broke the mold of their own level patterns to keep it fresh. After understanding the basics of Portal and the level editor I decided to plan out my levels.
To start, I listed out the mechanics that would be used in my levels. Then I planned each level and certain restrictions I would have with them to stay in scope for the project as well as proper pacing. I defined the estimated time to complete the level by a player who was familiar with the Portal series. I then set what mechanics would be used in the level to create the puzzles to help me not be stumped by having too many options. After that, I stated what room type it would be with a short description of each type.
The types were; “Open Room, all tools visible in one room”, “Partially Obscured Room, half of the tools are visible but the room is split”, and “Multiple Separated Rooms, tools are not visible across rooms”. These guidelines helped me lock down what things I could do and how to build on my puzzles efficiently. The planning document I created can be viewed below!
Play My Levels!
ABC Puzzle Design
When deciding how to introduce the mechanics and puzzles to the player I decided to take the ABC puzzle design approach. It’s a system that I use to understand how other games teach mechanics within puzzles and to organize my thoughts on how I want to introduce the mechanics to the player.
The images above we have our first couple of mechanics 1, 2, and 3. Ideally introducing A then B then C if the player has never engaged in these mechanics before. For this project however, the player we are focusing on is familiar with the mechanics of Portal so I didn’t need to introduce all these aspects separately. As seen in the planning document. My first level has three mechanics it at the start, I have a laser, jump gel, and flipping panels. Lets translate that to the ABC system!
I start with multiple mechanics in this first level, but within the level, I introduce them in isolation and use preexisting knowledge and quick feedback to make sure players understand the elements together. The first object that is interactable within the level is the laser and the reflective cube that falls to the right of the player. I introduce mechanic A by isolating it and having it be separate from B and C. Then the player must utilize the laser and reflective cube to activate B, the jump gel. This way I am introducing multiple elements in one level but in isolation so they are not overwhelmed. The level starts with A, then the player focuses on B without having to worry about mechanic A anymore. Therefore introducing it in isolation.
A
Laser
A
Mechanic 1
A
Laser

B
Mechanic 2
B
Jump Gel
Then the player is given a space with portable surfaces to utilize the jump gel. The space is limited making it so that the player is not overwhelmed by the amount of possibilities there would be. The goal is clearly presented to them get to the top of the ledge. The player will notice there is no other option but to go towards this ledge, as shown in the image to the right. Additionally, the connection points will guide the players’ eyes to where they need to go.
By removing the possibilities I eliminate potential confusion, red herrings, noise, etc. from the level making sure the player takes in the challenges and information I want them to.
Once the player gets up the ledge using the jump gel there is only one thing they can interact with that shows the connection to the blue dots shown in the prior image. The player is encountering the button/flip panels in isolation, like the other mechanics. The player presses the button and then leaves to see what the button affects and then sees the flipped panels. They don’t need to use any other mechanics thus far to interact with this system. Successfully introducing mechanics A, B, and C in isolation. Then I combine mechanics B and C together utilizing purposefully controlled affordances to show the player what they can do to complete the level.
C
Mechanic 3
C
Flip Panels


B
Jump Gel
C
Flip Panels
In this final part of the level, I connect the most recently introduced mechanics by using a similar strategy to mechanic B’s puzzle element to solve for C’s puzzle element. Moreover, via the level structure itself, I assist in the connection between B and C by making the platforms you apply the jump gel to positioned over the ‘stairs’ to the exit. The player then reuses the jump gel knowledge previously of using it to cover surfaces and jump up to places they can reach to complete the puzzle.
ABC puzzle design was how I structured each one of my levels and how each level effectively built off one another to finally get to the final level where I had several mechanics working together to create an advanced puzzle that was challenging but not foreign to the player.
B
Jump Gel
Guiding vs. Giving
Difficulty in puzzles comes in a variety of forms. Overwhelming the player with options, and the inverse of that limiting those options. Regardless, the player needs to still be guided through the level and needs to have some idea of what’s going on. I decided to tackle the problem of where giving guidance to the player in my level becomes giving them the answer by creating a consistent visual language and controlling the affordances of my levels.

©Portal 2. (2011). Valve Corporation
Developing a Visual Language
To guide a player, especially within levels, usually lightning and environment props are used to create leading lines. But sometimes those are too explicit and for the purpose of our games, they can tell the player too much. To solve this issue I created a series of consistent visual elements throughout all five of my levels to help communicate to the player what should be focused on. However, one important thing to note is that the visual elements I used are not obvious to players and they can miss the pattern if they are not paying attention.
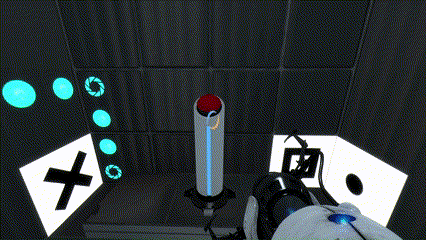
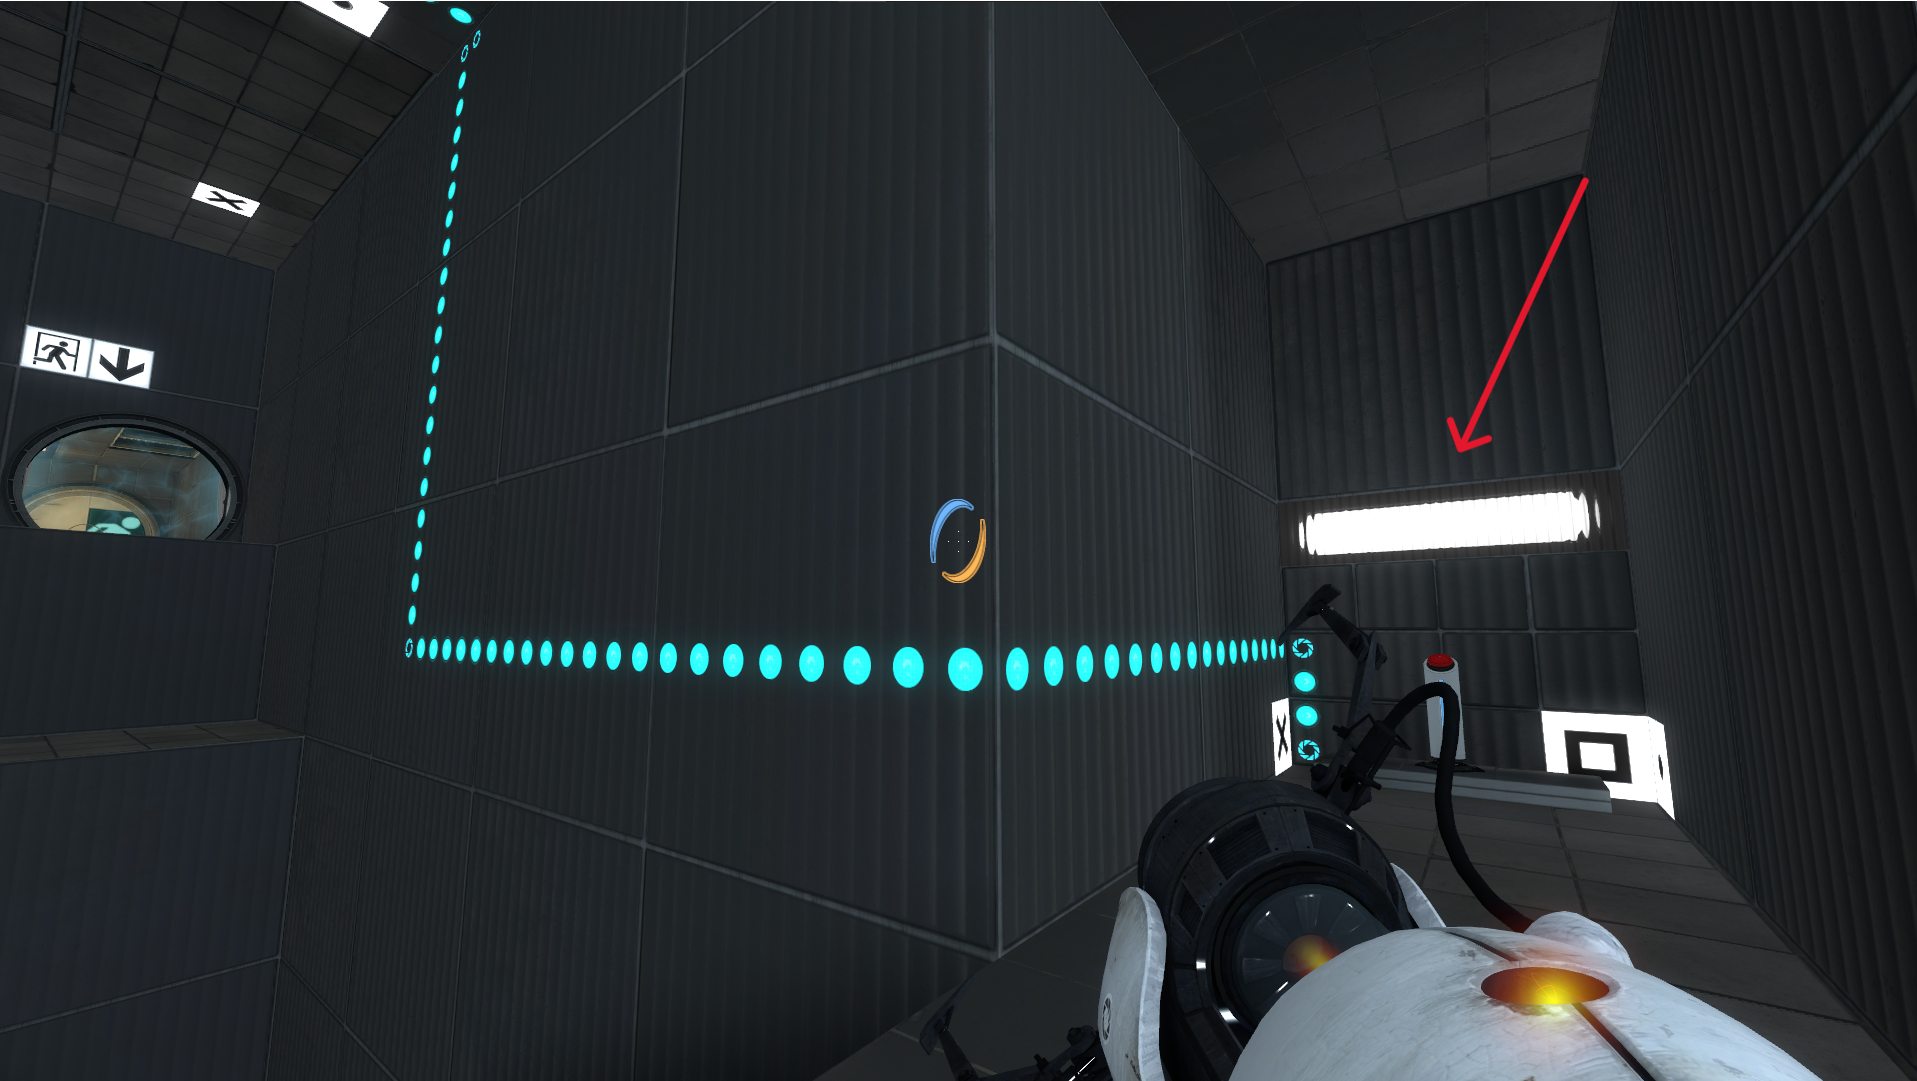
What are the visual elements? I utilize the built-in connection nodes to communicate to players what is related and where to start looking. Additionally, I placed light strips to indicate important pieces of the puzzle, but I don’t have them on every element. The light strips are my way of telling the player, “Hey… you might want to take a close look here”.
In this first level, I don’t give away that the light communicates what the player should look at. As you can see in the image below, the first thing the player sees when walking in is the connection lines, and maybe they notice the light. Once the player moves to that ledge, the light strip and connection dots help guide the player to where they need to go. I could have made the light the only thing to communicate to the player what they need to do next, but I wanted to start off subtly and increase the use of the light strip over time.

Visual Language in Practice
Let’s look at the other levels! In the next level, the player immediately sees their goal, and the aforementioned light strips are right there, reinforcing the visual language by tying the lights to the end goal. Therefore, it helps to implant the idea in the player’s head that light strips are associated with the goals of the level and help them complete it, as well as assist players in knowing where to go within the space.
The goal is for the player to clearly see which elements are highlighted by the light strips. This way, when players get frustrated, they always have an idea of where to start looking.

Controlling Affordances and Visual Noise
Players get overwhelmed, we all do. When there are too many options at our favorite restaurant or clothing store sometimes we lock up and don’t know what to do. I ran into this same issue in my puzzle design creation process, except with the added caveat that players could break my puzzle and get distracted by having too many options. Within the Portal 2 level editor, the solution to reduce the options for the player is making surfaces un-portable.


Within level two, the player needs to interact with puzzles in two different rooms. The first thing players will see when entering the two rooms is shown to the left and right.
See how I use consistent visual langauge in my other levels!
Level 3
Level 4

For example, in my third level when the player enters the space they see a lot of things; their goal, and all the things they can interact with in the room. I make most of the first room entirely unportable, to help reduce the amount of things the player can do so that they focus on what they can interact with.
As you can see in the pictures to the right, I intentionally placed all the portable surfaces next to the main puzzle pieces of the room. This is because if the entire room was portable it could create scenarios where players break the puzzles, and get frustrated with more possibility to get lost in trying something that will never work. I instead guide the player by eliminating possibilities to control the difficulty of the puzzles.
Additionally, I utilize the connections to help guide and reduce visual clutter. As seen in my level 3 images, there are only two areas where there are blue dotted connection lines. Portal 2’s level editor naturally creates these blue-dotted connections whenever you connect two objects. I intentionally made sure the level didn’t have too many connections and too many visual connection lines in order to help players understand what is important.
Level 5
Within this project I learned that a consistent visual language used throughout an evolving set of encounters and puzzles can alleviate stress, and minimize confusion. I learned how to control difficulty of my puzzles by thinking about the amount of options I would give to my players and the amount of visuals that I would use in the level to guide them to their own solutions of my puzzles.
Ending Notes
Learning Outcomes
I learned in this project the basics of puzzle design and how to properly introduce players to mechanics within games. I realized that a progressive additive approach to puzzles was the way to approach creating puzzles. The reason is the amount of mechanics the player has to interact with adds or subtracts from the difficulty of the puzzle. It’s my job to determine the right amount of tools to balance between simple and complex puzzles. By using the ABC puzzle design strategy I was able to introduce multiple puzzle mechanics over time in a manageable way.
The other strategy I learned from this project was using consistent visual language across levels. The visual language in the form of lights helped me communicate to the player what is important at the level and where they need to go.
Finally, I also learned another way to control puzzle difficulty by limiting what the player can interact with. By combining the visual language and limiting affordances to the player allowed me to create better puzzles that could build off each other.
Complications/Issues
The main complication is the amount of time and testers. Unfortunately, the project went by very quickly, and though I had around five weeks I wish I could have had a proper testing phase. The pace of DigiPen only allows for so much time to be allocated to a project. I realized in order to create five solid levels in 5 weeks I had to quickly figure out what strategies worked for me and rapidly prototype. I would have preferred to have a phase after I finished and briefly tested my levels to do formatted testing sessions. What I did do was test my own levels as I went. I presented them in informal tests with the professor and my peers with interviews afterward while taking observational notes during gameplay.
What I would have done differently was properly document and format the testing of my levels. I got lots of feedback but it was during lab time. I would take that feedback and immediately implement it and then test it and repeat it. Having proper sit-down playtest sessions I think would have given me better data on if all the strategies I employed were working exactly the way I intended them to.
Also if I had more time, I could have refined certain aspects of puzzles or reworked them. Some of my puzzles involve dropping boxes and relying on physics and gravity to get boxes onto a button. Which in hindsight was taking control away from the player, relying on the physics of the game which created inconsistencies. It created instances where a player could do everything right and they still might not get the result they want. Overall I believe with more time and formal testing phases I could have improved the quality of the puzzles.